Read More

Rendering Hacks

Rendering Hacks
Read More

Custom Brush

Create Custom Brushes
Read More

Light Effects

Ways to Light Effect
Read More

Hacks

Experimenting with Ibis materials
Read More

Another Light Effect

Soft Glow Magic

2/1/25

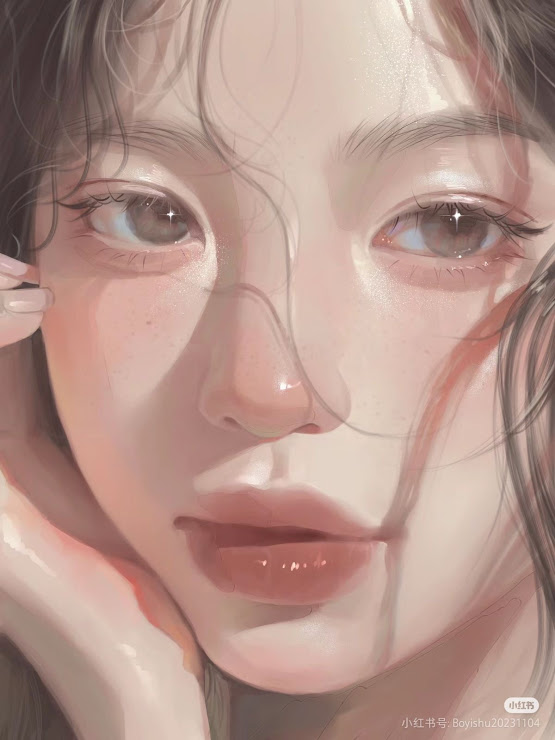
☆ Way To Skin Texture


☆ Way To Skin Texture 

Cr Art : Pinterest 

Hello everyone! Nai’s here. Now, let’s delve into techniques for creating realistic skin textures in Ibis Paint X, enhancing the lifelike quality of your digital portraits.

1. Laying the Foundation

Begin by establishing a solid base for your skin tones.

Steps:

  1. Base Color:
  • Choose a mid-tone color that represents the average skin tone of your subject.
  • Fill the skin areas uniformly using the “Bucket Tool” or a standard brush.
  1. Layer Organization:
  • Create separate layers for different aspects of the skin, such as base color, shadows, highlights, and textures.

2. Shading and Highlighting

Add depth and dimension to the skin by incorporating shadows and highlights.

Steps:

  1. Shadows:
  • On a new layer set to “Multiply” blending mode, apply a slightly darker tone to areas that naturally receive less light.
  • Use a soft brush to blend the shadows smoothly into the base color.
  1. Highlights:
  • Create another layer set to “Add” or “Overlay” blending mode.
  • Apply lighter tones to areas where light hits the skin directly, such as the forehead, nose bridge, and cheekbones.
  1. Color Variations:
  • Introduce subtle hues of reds, blues, or yellows to mimic the natural variations in skin tone.
  • This can be achieved by lightly brushing these colors onto the skin and blending them appropriately.

3. Adding Skin Texture

To achieve a realistic appearance, it’s crucial to simulate the fine textures of human skin.

Steps:

  1. Texture Brushes:
  • Utilize specialized texture brushes available within Ibis Paint X or import custom brushes designed for skin detailing.
  • Lightly apply these textures over the skin areas to replicate pores and subtle imperfections.
  1. Noise Addition:
  • On a new layer, fill the area with a neutral gray color.
  • Apply a noise filter to this layer to create a grainy effect.
  • Set the layer blending mode to “Overlay” and adjust the opacity to achieve a subtle skin texture.
  1. Detail Refinement:
  • Zoom into your artwork and manually add fine details such as freckles, moles, or slight discolorations using a small, soft brush.

4. Blending and Final Touches

Ensure all elements of the skin blend seamlessly for a cohesive look.

Steps:

  1. Smooth Transitions:
  • Use the “Smudge Tool” or a soft airbrush to gently blend between shadows, mid-tones, and highlights, ensuring there are no harsh lines.
  1. Layer Adjustments:
  • Fine-tune the opacity and blending modes of your layers to achieve the desired intensity of shadows, highlights, and textures.
  1. Overall Color Correction:
  • Apply adjustment layers or filters to harmonize the skin tones with the rest of your composition, ensuring a natural and realistic appearance.

By following these steps, you can create lifelike skin textures in your digital portraits using Ibis Paint X. Happy illustrating!

For a visual demonstration, you can watch the following tutorial:


https://youtu.be/yZP4Wz7reaI?si=NA6CAo_RgA-bRG94


Read More

☆ Neon Light Effect


☆ Neon Light Effect 

Cr Art : Pinterest 

Hello everyone! Nai’s here. Today, let’s explore how to add striking neon light effects to your illustrations using Ibis Paint X, giving them a futuristic touch.

1. Preparing Your Artwork

Before adding neon effects, ensure your base illustration is ready.

Steps:

  • Complete the Base Drawing: Finish your line art and base colors.
  • Organize Layers: Keep elements you want to enhance with neon effects on separate layers for easier editing.

2. Creating the Neon Effect

Now, let’s add the neon glow to your illustration.

Steps:

  1. Select the Element:
  • Choose the layer containing the part of your illustration you want to apply the neon effect to.
  1. Duplicate the Layer:
  • Duplicate this layer to preserve the original.
  1. Apply Outer Glow Filter:
  • With the duplicated layer selected, go to the Filter menu.
  • Choose “Glow (Outer)” from the Style filters.
  • Adjust the radius to control the glow’s spread.
  • Select a vibrant color for the glow to achieve the neon effect.
  1. Enhance the Glow (Optional):
  • To intensify the neon effect, you can duplicate the glowing layer multiple times.
  • Experiment with different blending modes like “Add” or “Screen” to achieve the desired brightness.

3. Refining the Effect

Fine-tune the neon effect to make it more realistic.

Steps:

  • Adjust Opacity: Lower the opacity of the glow layers if the effect is too strong.
  • Add Highlights: On a new layer, use a soft brush to add subtle highlights around the neon-lit areas to simulate light reflection.
  • Color Balance: Ensure the neon color complements the overall color scheme of your illustration.

By following these steps, you can effectively create eye-catching neon light effects in your illustrations using Ibis Paint X. Happy drawing!

For a visual demonstration, you can watch the following tutorial:


https://youtu.be/otqHHxESrAc?si=FFDxohSQANDiY6nq


Read More

☆ Background tips n tricks


 ☆Background tips n tricks

Hello everyone! Nai’s here. Today, let’s delve into tips and tricks for creating captivating backgrounds in Ibis Paint X to enhance your digital artwork.

1. Utilize Layers for Depth

Layers are fundamental in digital art, allowing you to separate different elements of your composition.

Tips:

  • Background Layer: Start by creating a base layer for your background elements.
  • Foreground Elements: Place main subjects on separate layers above the background.
  • Adjustment Layers: Use additional layers for lighting, shadows, and effects to add depth.

This approach enables non-destructive editing and flexibility in adjusting individual components.

2. Leverage Perspective Tools

Ibis Paint X offers perspective tools to help create realistic spatial depth.

Steps:

  1. Activate Perspective Tool:
  • Tap on the ruler icon and select the “Perspective” option.
  1. Choose Perspective Type:
  • Select from one-point, two-point, or three-point perspective grids based on your scene.
  1. Draw with Guides:
  • Use the grid as a guide to sketch objects, ensuring accurate scaling and foreshortening.

This tool assists in maintaining consistent angles and proportions, enhancing the realism of your backgrounds.

3. Incorporate Textures for Realism

Adding textures can bring your backgrounds to life by simulating various surfaces.

Methods:

  • Built-in Materials:
  • Ibis Paint X provides a library of materials like paper, fabric, and stone.
  • Access them by tapping on the “Material” tool and selecting your desired texture.
  • Custom Textures:
  • Import your own textures by saving images to your device and adding them as layers.
  • Adjust the layer’s blending mode and opacity to integrate the texture seamlessly.

Textures add complexity and interest, making your backgrounds more engaging.

4. Experiment with Lighting and Shadows

Effective use of lighting and shadows can dramatically impact the mood and depth of your scene.

Tips:

  • Light Source:
  • Determine the direction and intensity of your light source.
  • Shading:
  • Use darker tones to create shadows where light is obstructed.
  • Highlights:
  • Apply lighter tones to areas where light hits directly.
  • Blending:
  • Utilize blending brushes to smooth transitions between light and shadow.

This technique adds dimensionality and realism to your backgrounds.

5. Use Color Theory to Set the Mood

Colors play a crucial role in conveying the atmosphere of your scene.

Guidelines:

  • Warm Colors:
  • Reds, oranges, and yellows evoke warmth and energy.
  • Cool Colors:
  • Blues, greens, and purples suggest calmness and serenity.
  • Complementary Colors:
  • Pairing colors opposite on the color wheel creates contrast and visual interest.

Thoughtful color selection enhances the emotional impact of your background.

By implementing these strategies, you can create compelling and dynamic backgrounds in Ibis Paint X that enrich your digital illustrations. Happy drawing!


Read More

☆ Watercolor-like Artstyle


☆How to create a watercolor-like texture in Ibis Paint X

Cr pic : lizzy on Pinterest 

Hello everyone! Nai’s here. Today, let’s explore how to create a watercolor-like texture in Ibis Paint X to add a traditional, artistic feel to your digital artwork.

1. Using the Wet Edge Filter

Ibis Paint X offers a “Wet Edge” filter that simulates the natural spread and edge darkening of watercolor paint.

Steps:

  1. Prepare Your Base Illustration:
  • Create or open the artwork you want to enhance with a watercolor effect.
  1. Apply the Wet Edge Filter:
  • Select the area where you want to apply the effect.
  • Tap on the “Filter” tool.
  • Choose “Wet Edge” from the list of filters.
  • Adjust the width and strength sliders to achieve the desired watercolor effect.
  •  Tap the checkmark to apply the filter.

This method allows you to add a watercolor-like texture to specific areas of your artwork, giving it a more organic and traditional feel. 

By following these steps, you can create beautiful watercolor textures in Ibis Paint X, enhancing the depth and expressiveness of your digital art. Happy painting!

For a visual demonstration, you can watch the following tutorial:

https://ibispaint.com/lecture/index.jsp?lang=en&no=68&utm_source=chatgpt.com


Read More

Social Profiles

Twitter

Get to know the creator

Blog Profile

My photo
Hai there! i'm nai, and currently a highschool stud on my senior year

Popular Posts

Categories

Blog Archive

Search This Blog

Powered by Blogger.

Pages - Menu

Recent Post

☆ Way To Skin Texture

Copyright © The Lazy Artist’s Guide to Digital Art Hacks (Ibis Paint x) | Powered by Blogger
Design by Lizard Themes | Blogger Theme by Lasantha - PremiumBloggerTemplates.com